Monday, December 24, 2012

Rusty DeLorean headlight buckets

While getting the DeLorean ready to work on the lower ball joints, I noticed some rust on the headlight buckets and screws. I decided to remove one of the passenger side headlights to get a better look as to what is going on there. After I took out the headlight, this is what I found:

Photobucket 

The rust is just surface rust, so it can be cleaned up very easily. As I began trying to clean up this headlight bucket with a wire wheel, I decided that I might try using POR15 instead of just a rustoleum spray paint. I want the restoration to last for the life of the car, and sometimes rustoleum doesn't last. In order to get the other lights out easily, I may end up removing the front fascia. I haven't decided the best way to make these look nice again, but I'm in no hurry as it is now winter and I don't plan on driving the DeLorean until the salt is off the roads. 

Bad DeLorean Lower Ball Joint

I went to go have an alignment done this past weekend and the shop discovered that the lower ball joint on the driver side is shot. I found this odd since the previous owner had replaced these just a few thousand miles ago. I discovered that the batch of lower ball joints that the previous owner had installed were faulty and a poor design. This caused many to fail prematurely, as noted by many owners on the DeLorean forum at www.dmctalk.org.

In order to never have another lower ball joint failure, I purchased upgraded ones from the DMCUK club for $130 for the pair. I might as well replace both of them now. Below is a video that I took that shows how much play the ball joint has and why it needs to be replaced:

While looking through the list of past repairs on my DeLorean, I also discovered that the previous owner had replaced the original lower control arms with aluminum ones, which is great because I will not have worry about them rusting out like so many that I have seen.

Below is a picture of the front driver side suspension that I will be disassembling to replace the ball joint:

Photobucket 

Since it's Christmas time and I just barely ordered the parts, the DeLorean may be out of commission for a while until the parts arrive. All I can do for now is wait. I'll post an update once I have these installed.

Replacement DeLorean Brake Master Cylinder

One of the first repairs that I did on the DeLorean after I first bought it was replacing the brake master cylinder. When I bought the DeLorean, I knew that it was in need of replacement. I had to pump the brake pedal to build up enough pressure to stop. This job was very straightforward and I didn't take any pictures. I just had to have something to catch the brake fluid that came out when I removed the two brake lines from the master cylinder. I then unbolted the master cylinder from the power/servo unit.

I then removed the original fluid reservoir and cleaned it out with brake cleaner before installing it on the new master cylinder. I then bench bled the new master cylinder before installing it into the car. I then hooked up the brake lines into the new master cylinder before bleeding the brakes at all four wheels. I prefer to bleed the brakes with someone else helping me by pushing on the brake pedal.

The brakes immediately felt better after going out for a test drive. Here is a picture from underneath the car of the new brake master cylinder:

Photobucket

Tuesday, October 9, 2012

DeLorean Cold Start Issue

Here in the Rockies, it can get pretty cold. Last fall and winter, when I would go to start the DeLorean when the engine and temperature were cold, it would just crank and crank. If I cranked it a few times, then left it alone for about 5 to 10 minutes, it would usually start up after trying again.

Dave at DMCMW thought that the problem was the TTS (thermo time switch), which basically tells the fuel system to deliver more fuel upon starting when the engine is cold. Well last winter came and went and I almost forgot about the cold start issue because it doesn't occur unless it is below about 50 degrees F.

It was cold here a couple of weeks ago and the car started showing symptoms of the cold start issue again. It just so happened that I was in Houston for business again and decided to use this as an excuse to stop by and pick up the part. I snapped a couple of photos outside the building again:

Photobucket

Photobucket 

It was nice to save a few bucks on shipping for such a small part.

The old switch came out quite easily, but what I didn't know what that coolant was going to start gushing out of the hole where the switch goes. I had to quickly get the new one threaded in to minimize the mess in my garage. Here's the old switch that I took out:
 Photobucket 

Here's the new switch installed correctly:
  Photobucket 
I did the install on a very cold morning and did not attempt to start the car until I completed the install. When I went to start it cold, it fired up with no problems on the very first try. Problem solved!

Tuesday, July 24, 2012

DeLorean Luggage Net Repair

I always liked the stock look of the luggage net behind the seats in the DeLorean pictures I have seen online. The net in my DeLorean was removed before I bought it, but I found it in a box of parts. I discovered that the bungee cord around the net was fraying terribly in multiple places which not only made it a terrible eye sore, but it didn't function very well either.

New old stock (NOS) net assemblies are for sale at DMC Houston, but I didn't really feel that these were worth nearly $50 for a new one. I went to local fabric stores and Home Depot, but none of them sold the bungee cord by the foot. I discovered an online company that does sell them by the foot at this website. I decided to go with the black 3/16" cord. I removed the old bungee cord from the net and it measured at about 7.5 feet. I decided to get 8 feet of new bungee cord to be safe and I would trim down any extra length.

It arrived a week later and I set the two cords side by side and cut the new cord to the exact length of the original. Here is a picture of the old, frayed cord laying next to the new bungee cord:

Photobucket

I then weaved the new cord into the net and hooked the two ends together using the supplied clamps.
Below is the image of the two connected ends:

Photobucket 

As you can see, the original net was still in great condition, but it had an awful smell, like it had spent time in a house of a smoker. It was a really strong smell too and I didn't want to reinstall it into the DeLorean without getting rid of the smell first. Before I installed the new bungee cord, I first washed it by hand, and the brown soapy water that came off that net was very gross. I then sprayed it on two separate occasions with Febreeze to eliminate the odor. I then rinsed it thoroughly and dried it in a clothes dryer. It still has a very faint smell to it, but it is extremely better than it was when I found it.

Here is the net all put back together and almost ready for assembly. The original net has some black thread that attaches the net to the bungee cord in four places so that the net is always in the same relative place on the bungee cord. Be sure to replicate those attachment points using the black string of your choice, or else the net will not look right when reinstalled in the DeLorean.

The one thing I didn't realize was that the new cord has much less elasticity than the original bungee cord. The old one was made up of many thin, gray elastic strands, but the new one appears to just be one solid, white strand of an elastic material. This means that it is much harder to stretch the new material to fit correctly on the hooks on the back shelf. If I were to do this again, I wouldn't have trimmed any length off of the 8 foot bungee cord, and I recommend getting a bit more than that. I did make it work, but the cord is definitely tight.

I hope that it will loosen up over time, but I am leaving it in place for a very long time to allow it to stretch. Here is the old net with a new bungee cord installed in my car for the first time since I have owned it:
Photobucket

DeLorean Instrument Cluster Status Updates

After I replaced the trip reset shaft, replaced the burned out battery light with a new #161 incandescent bulb, and replaced all other instrument cluster lights with the appropriate LEDs, I reinstalled the binnacle in the car. I was pleased to see that the car charged correctly right on start up because of the new battery light, but I noticed a couple of side effects from some of the LEDs.

First, the door ajar light would still dimly glow for a long time after the doors were shut. After posting about this problem on the DMC forum, I discovered that the original lamp delay relay found here doesn't play well with LEDs. This relay is supposed to slowly dime the interior courtesy lights once the doors are shut. The solution was to remove the relay from the fuse compartment and the door ajar light now functions perfectly again.

Dealing with this issue has brought to my attention the fact that my interior courtesy lights do not function as they should, nor have they ever functioned properly since I've owned the DeLorean. They come on when I switch them to "always on," but never come on in any other setting when the doors are opened like they are supposed to. This is not a huge deal right now, but I will try and get them functioning correctly some time in the future.

I went for a test drive after reinstalling the binnacle and I felt like the speedometer wasn't showing that I was going the right speed. It felt like it was saying I was going a lot slower than what it felt like. To test this, I used my Garmin GPS and went for a drive. Before I took the binnacle apart the first time, the speedometer was always very close to what speed the Garmin said I was going, but on this trip, I discovered that my hunch was correct and that the speedometer was showing I was going about 3 to 5 miles an hour slower than I actually was traveling.

I must not have put the needle on the speedometer in the exact position it was in before I took it apart. I removed the binnacle and put the needle to where it should have been. A test drive showed that the speedometer is now much closer, especially at speeds under 55, and then only off by 1 mile and hour at higher speeds. That is an acceptable variation for me. Here's a picture I snapped while I was working on adjusting the speedometer needle:

Photobucket 

One other issue I discovered while converting the instrument cluster lights over to LEDs was that the parking brake light started acting strangely. The light worked correctly if the car was running or if the key was set to the "On" position, but once the key was set to the "Off" position, the parking brake light would stay dimly lit if the handbrake was not engaged. It would go off immediately if I pulled up on the handbrake, but it would come back on very dimly if the brake was not engaged.

I noticed that the previous owner had some wires coming off of the handbrake that were somehow tied into the car's alarm system. It was likely causing a small draw on that circuit, causing the LED to light up. The incandescent light must not have received enough juice to cause it to light up at all, but since the LED requires less juice to light up, it brought this issue to light.

Since I didn't feel like diving any more into the car's electronics, I simply replaced the brake light LED with the working incandescent bulb that was in there previously. Putting it all back together revealed that the light worked properly again with no glowing when the car was off. Maybe I'll dig into this in the future, but I'm not going to worry about this for now, especially since the car's battery disconnect switch is engaged whenever I'm not driving the car regularly. 

Friday, July 13, 2012

DeLorean Trip Odometer Repair and LED Dashboard Lights

It's always a good feeling to come home and see a parts package for the DeLorean waiting for me. Ever since I have owned my DeLorean, the trip odometer reset shaft has been sheered off right behind the plastic as seen here in a "before" photo:

Photobucket 

Well I decided to finally fix this once I discovered that the battery light in the dash was also burned out. In my DeLorean, the alternator wouldn't charge the car until it got up to about 2500 RPMs after it was started because that light was burned out. It is an integral part of the charging system in these cars. I also had ordered some LEDs for the dashboard lights that I had yet to install and this was a great opportunity to do that too.

In order to remove the binnacle, you have to lay on your back so your head is by the gas pedal so you can remove all of the nuts holding the binnacle to the dashboard. Since I am 6 1/2 feet tall, I decided to remove the driver's seat completely to give me room to work and lay down:

Photobucket 

I won't give detailed instructions on the removal process since there are plenty of write-ups on that elsewhere on the web. I will say that it's much easier to remove all the connections on the back (speedo cable, electric connections) than it is to put them back together. This is what it looks like after the binnacle has been removed:

Photobucket

To work on the binnacle, I laid a towel on a table and went to work. This is what the back of the binnacle looks like:

Photobucket 

To replace the trip reset shaft, I just followed the provided instructions and completed the job without any problems. I also replaced the battery light with a #161 incandescent bulb from Autozone and replaced the other lights with LEDs from Super Bright LEDS. I decided to use WLED-WH5 "warm white" lights for the backlight of the instrument cluster because I didn't want the blue hue that the other color appeared to have. For a complete list of lights that I used, you can visit this blog for a comprehensive list with before and after pictures as well.

In the middle of the job of replacing the trip reset shaft, things looked a little hairy:

Photobucket 

Everything went back together fine and the initial test found that everything works and looks great. I still haven't bolted everything back down in the car, but I'll take care of that this weekend. This is what the final product looks like with the new trip reset shaft:

Photobucket

Friday, July 6, 2012

Car Show & Parade

The evening before the 4th of July, my home town hosts a local car show. Last year I was unable to bring the DeLorean because it was in the middle of being repaired, so this was the first time that I had the opportunity to bring it to the show in the town where I grew up. I had been looking forward to this car show ever since last year. It was a much smaller show than others that I had attended so far this year, but that was just fine.

The problem with having a car show in July 3rd is the heat. It was definitely a hot day, but it was still loads of fun having people I had known for a long time be able to see the DeLorean for the first time. This was definitely the first time a DeLorean had attended the local show. At the very end of the show, some kids of our friends wanted to sit in the car, so we took off all of the "Do Not Touch" signs and let them have a seat:

Photobucket 

As you can see in the photo above, we brought our miniature DeLorean model and some hot wheels and had them on display in the car. We ended up giving a couple of the hot wheels to those kids. I snapped a couple of other photos before we left the show:

Photobucket 


Photobucket 

The next morning, we drove back out to my home town to be in the local 4th of July parade. We stuck a couple of flags in the rear, in the intake and antenna vents, and drove with the doors up while we threw candy to the kids. It was such a blast.

My parents still live in my home town and they took some pictures when we drove by, as well as provided us with some nice cold water:

Photobucket 
 
Photobucket 
 
Photobucket 
 
Photobucket
My nephew even rode along for about 10 feet and got to throw out some candy:

Photobucket 
 
Photobucket 
 
Photobucket

Friday, June 8, 2012

2nd Car Show

Each year in my home town, on the first Friday of June, a historic street in my city is closed off for three city blocks for the annual car show. This was the first time that I had the DeLorean in road worthy condition when it came time for the show, and I was very excited to be able to go. This car show attracts thousands of local citizens and over 300 cars.

Overall, it was a very nice experience. Despite the four "look, but don't touch" signs on all four sides of the car, the DeLorean came away with way too many fingerprints during the show. When the show started, it was really hot outside, and with the sun shining hard on the passenger side, I decided to start the show with that door closed to block the sun from the interior. 

 I was sitting a good 30 feet away in the shade. I didn't see this incident happen, but my wife said some guy was looking at the car, then proceeded to open the passenger door, and then close it with the greasiest hand I have ever seen. You could have cooked fries with the grease that he left on the door. It was disgusting.

First, "look, but don't touch" includes not opening and closing my car's door.
Second, wash your dang hands once in a while, Mr. Pepperoni Pizza Hands.

I decided to simply open the door to hide the massive grease mark on the door. It looked a lot better open anyway, but I would have preferred to have done it on my own time. I need to wash it again anyways as I parked under a shade tree the next day and got 15 bird poo splatters on my car in a 3.5 hour period. I still didn't appreciate Mr. Greasy Hands.

Here are a few pictures that I snapped of the DeLorean as the show was winding down:
Photobucket 

  Photobucket 

  Photobucket 

There was a steady stream of people the entire show and I really enjoyed the reactions of the people that we excited to be able to see a DeLorean in person. There were quite a few Back to the Future references, but luckily not enough to make me hate the show.

I was even interviewed by a no-name car show that is trying to get on the air. That was the first time that I had ever been in front of a television camera, and it was pretty fun. I got to talk about the car's history and tell about some of the things that make it unique and fun to own. They gave me their business card with their web site, so we'll see if I ever show up on there. The web site was www.exoticcarmagazine.com. As of today, it doesn't appear to have been updated in a long time.

Other unique cars at the show included a 1975 Bricklin and a 2005 Ford GT.

The next day was another car show, but we were in the process of house hunting and decided that we would just stop by and look and not stay with our DeLorean. We saw a lot of the same cars there that we had seen the day before, including the Bricklin. I am also a Jeep fan, and there were two awesome Willy's Jeeps from the 1940s at the show. I snapped a couple of pictures:
Photobucket 
 
Photobucket
We noticed that when we were walking back to the DeLorean, it was attracting quite the crowd just parked there. It was kind of fun to drive away with a bunch of people staring at us. I am looking forward to some other shows coming up later this year. I just need to get the A/C working first.

DeLorean's Automatic Antenna Replacement

Using a DeLorean parts crossover list that I ran across on 
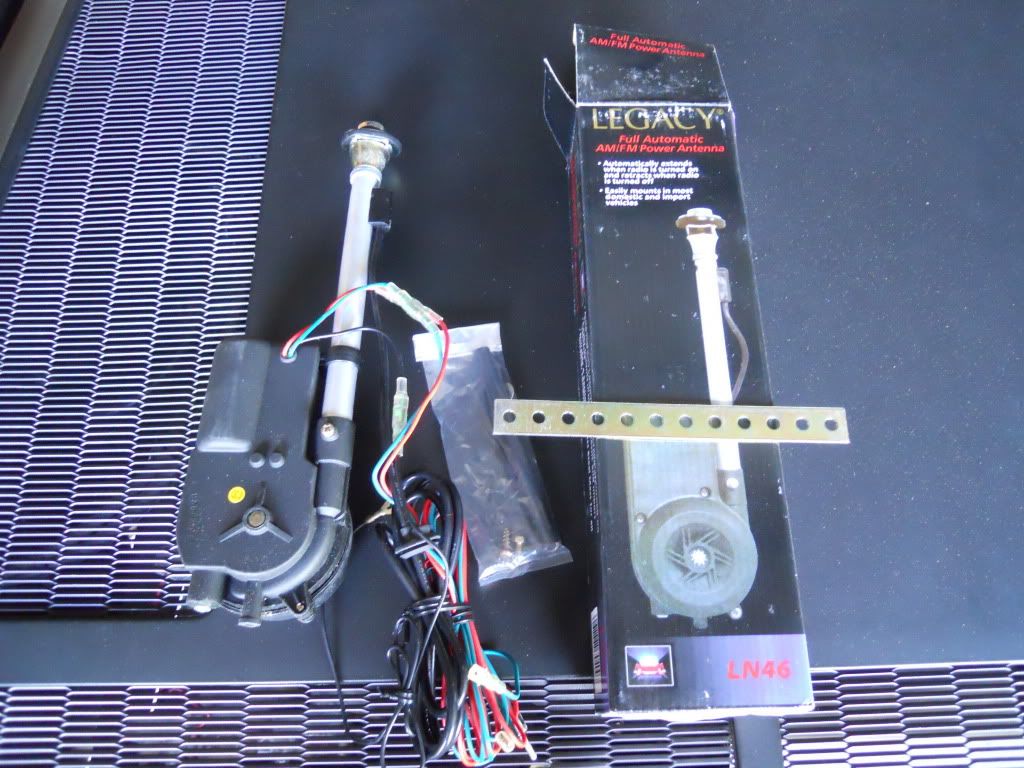
the DeLorean forum, I decided to purchase a replacement automatic radio antenna for my DeLorean since it has never worked since I have owned the car. The parts crossover list recommended the Legacy LN46 antenna, and I was able to find an purchase a new one on ebay for a little over $30. Here are the parts that it came with:
Photobucket 

I felt very confident in my abilities to tackle this replacement, especially after readying some how-to threads online. For those that don't know, the automatic antenna is located in the rear driver's side pontoon and is supposed to go up when the radio is turned on and go down when the radio or car is turned off.

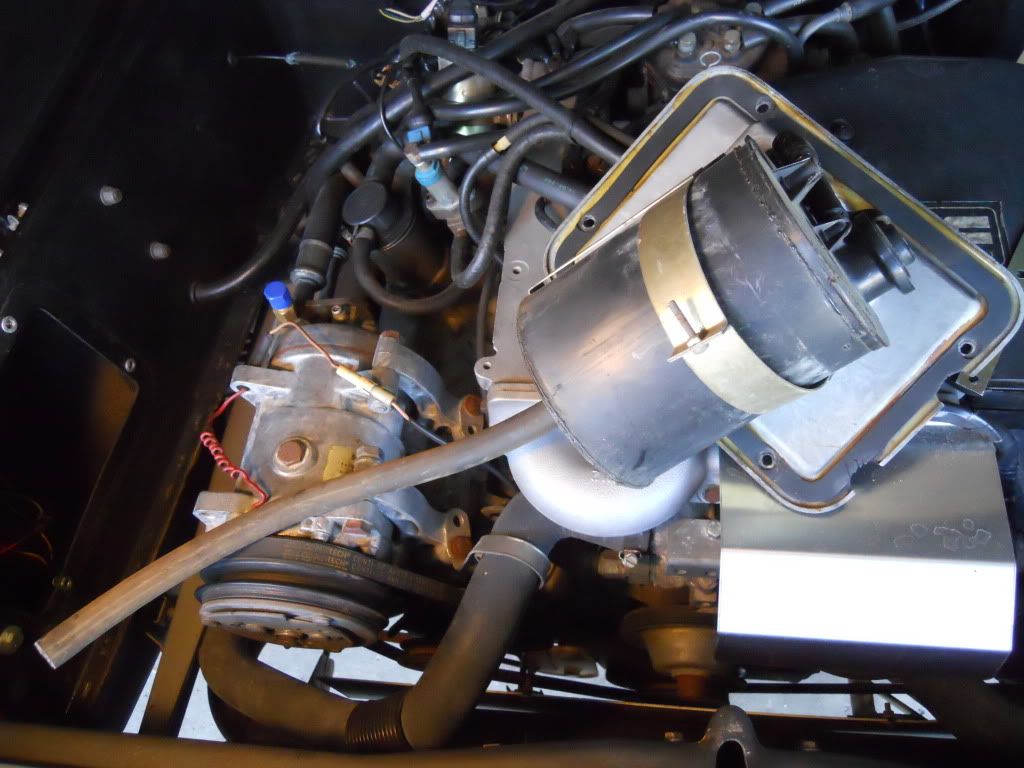
Replacement of the antenna first requires gaining access to the antenna, which is done by removing the bolts holding the charcoal canister cover inside the engine compartment. I took it out and set it on top of the engine:
Photobucket 

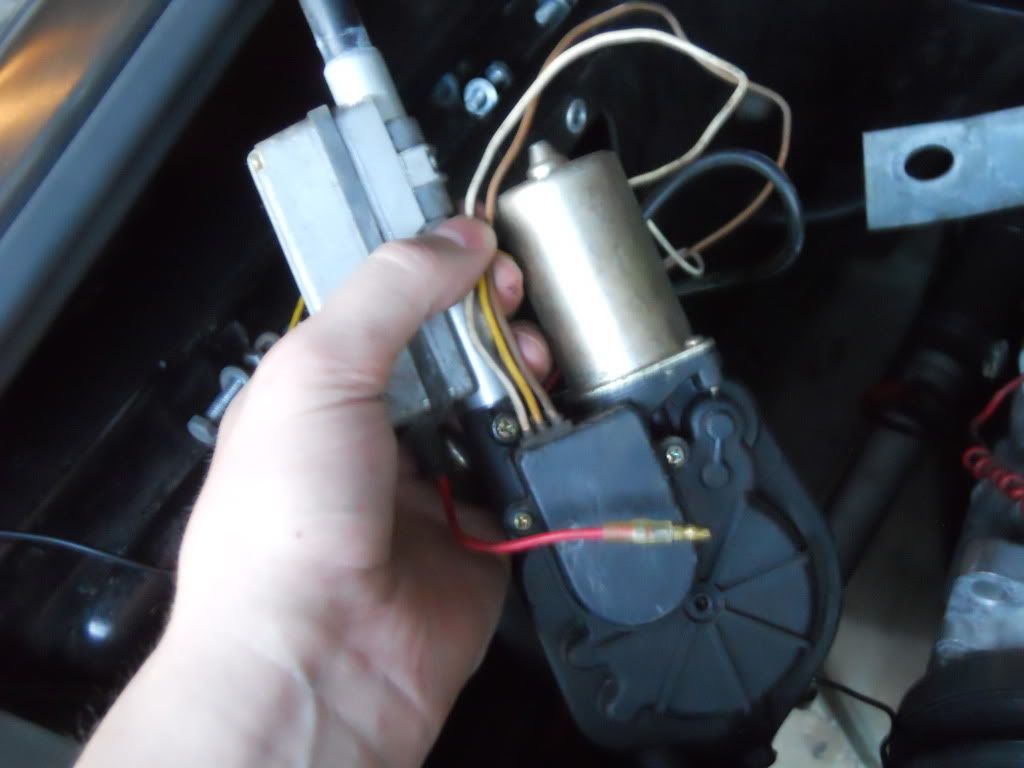
This is what the old antenna looked like inside the pontoon:
Untitled 

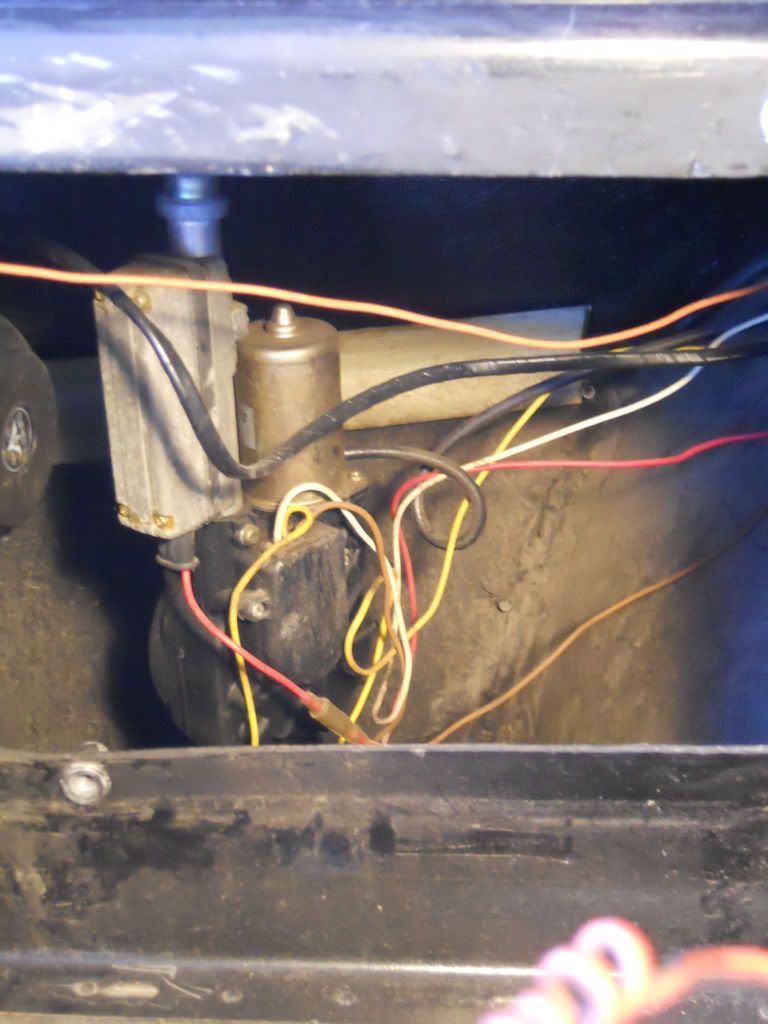
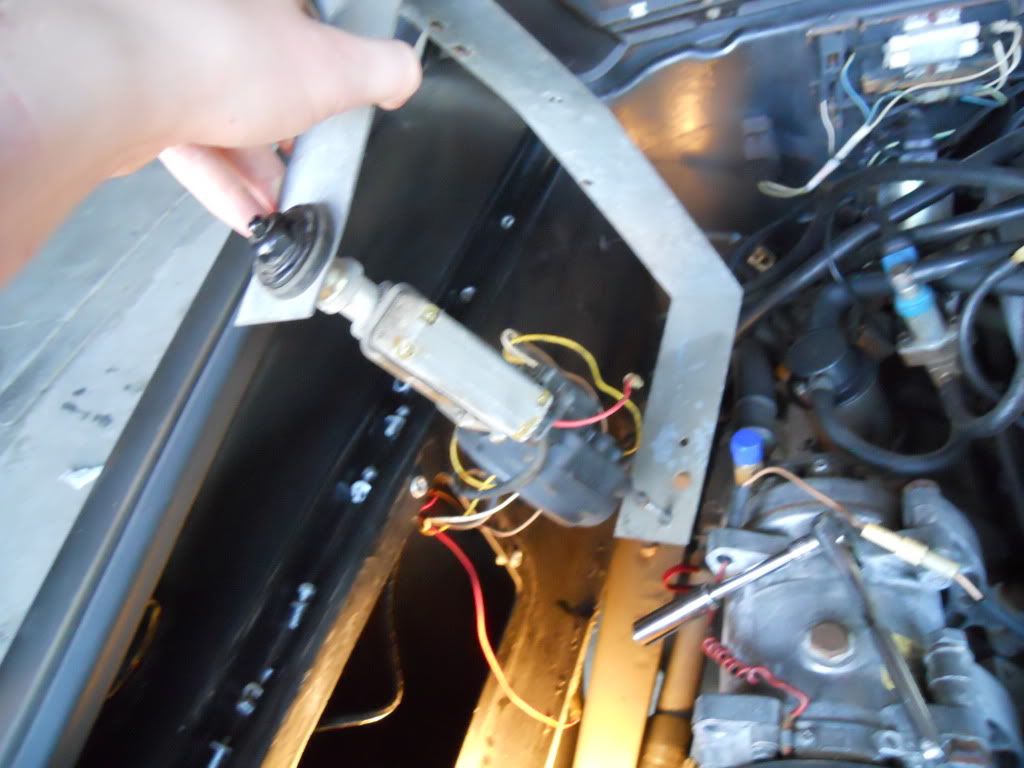
 It was secured to a metal bracket that was secured to the inside of the pontoon. After undoing a couple of nuts, it came out attached to the bracket. This is what it looked like when it was removed:
Photobucket 

The not-so-fun part came next. I wasn't sure how the new antenna was supposed to be wired into the car because a) there were more wires on the old antenna than the new antenna and b) the wires were different colors. Here are the wires on the old antenna:
Photobucket 

Here are the wires that came on the new antenna:
Photobucket 

On the new antenna, I assumed that the black wire was the ground, the red wire the power, and the green wire the one that need to get hooked up to the radio deck. I tested this theory by using a car battery to activate the antenna and confirmed my suspicion. The problem is, on the original antenna, it had a relay in a small compartment on the shelf behind in the driver's side seat. The new antenna has a relay built into it, so you need to bypass the old relay completely.

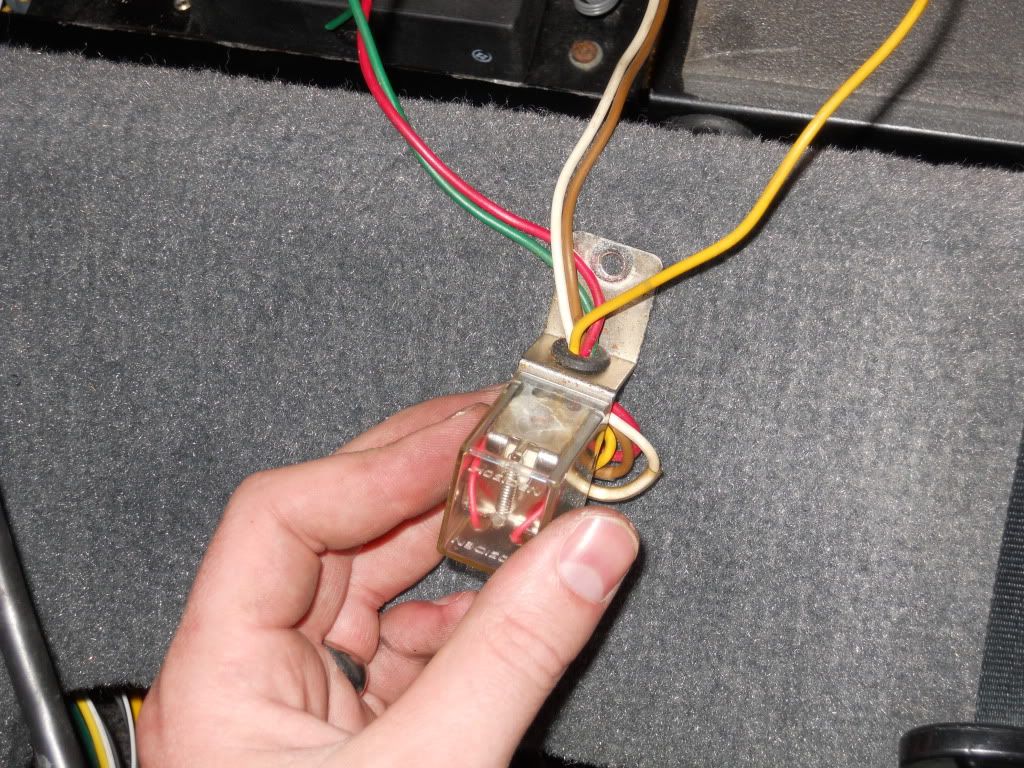
Below is a picture of the old relay that needs to be removed completely:
Photobucket 

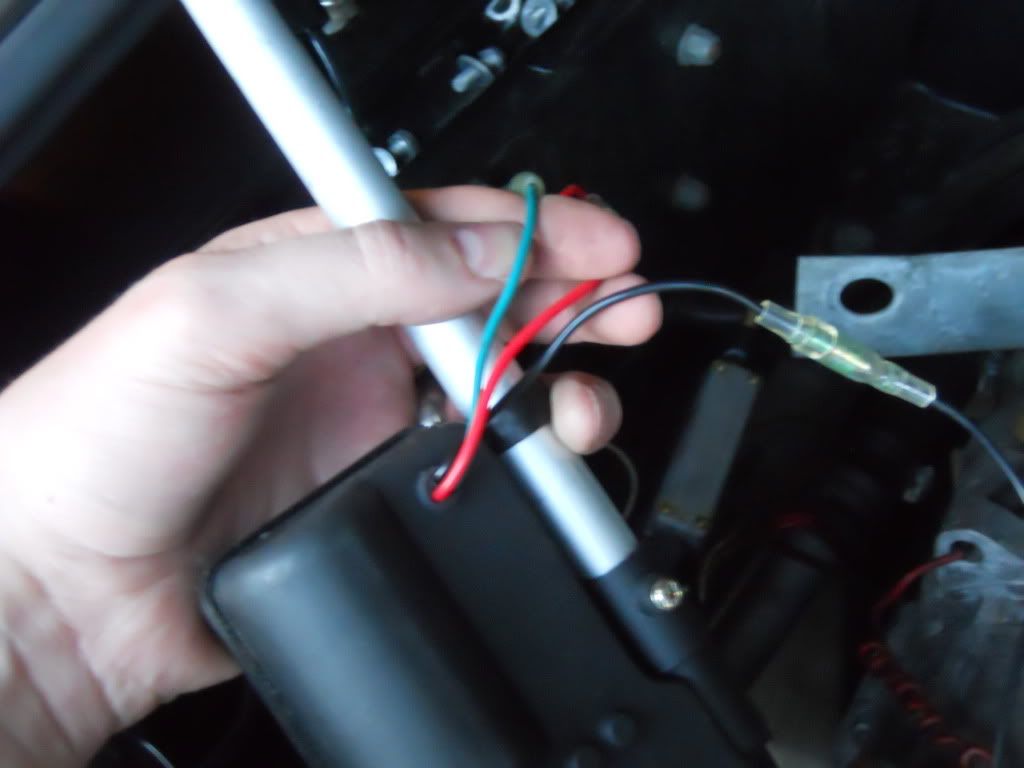
I hooked the red power wire from the new antenna to the red power wire that used to go to the old relay. The confusion on my particular setup was where to hook up the green wire coming from the new antenna. I first tried hooking it up to the white wire that used to go to the relay, as see in the picture below:
Photobucket 

The antenna did not work when it was hooked up like this. I then went to the internet forums to get help in figuring out what I was doing wrong. My particular setup is unique because instead of having a blue signal wire coming from the back of the radio deck, I have one group of cables that go to a receiver unit that the previous owner put in the cubby behind the driver's seat.

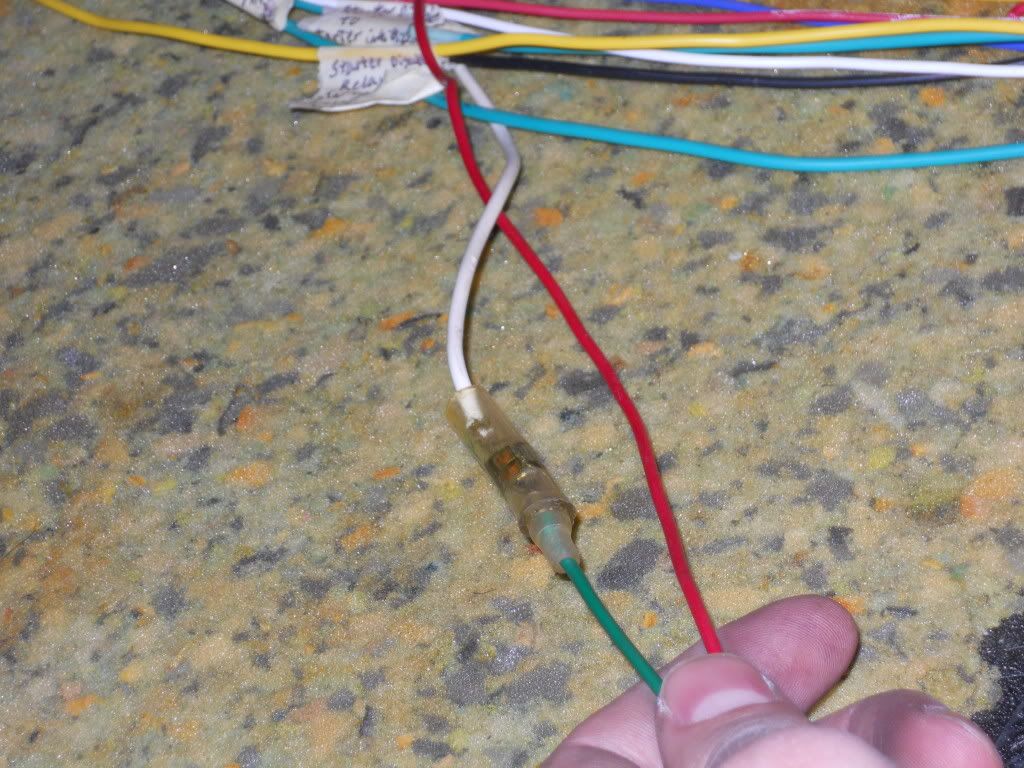
I dug up the installation manual for the radio and found that one of the wires coming off of the receiver unit was labeled as ANT CONT, which I figured might be the antenna signal wire that tells the antenna when to go up or down.
Photobucket 

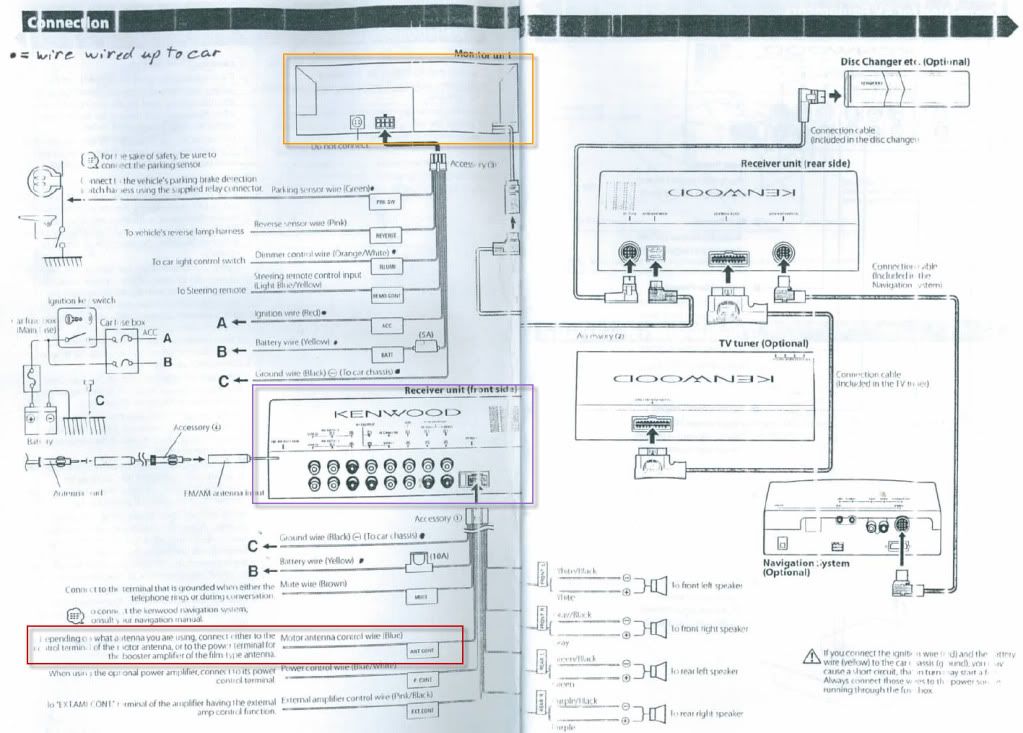
I hooked up the green wire from the antenna to that, hooked up the radio antenna reception cable, and made sure the ground wire was in a good known ground at the back of the car and I was ready to test. The antenna worked, but I think that the antenna that I ordered is faulty because it doesn't go up or down very well at all. It's like the motor isn't working like it should. It won't come up all the way on its own, and it won't go down unless I help push it down when the motor is trying to pull it down. I am not going to worry about it for now because I mostly always listen to MP3 CDs when driving it anyway.

The antenna was really hard to get to line up correctly so it came out where it was supposed to. The charcoal canister doesn't leave much room for the antenna inside the pontoon. It was a much more frustrating and time consuming install than I originally anticipated, so hopefully this post will help you avoid the same pitfalls that I encountered.

Sunday, April 29, 2012

First Car Show

Car show season has arrived. The local car show was just down the street from my house and was organized to bring awareness about autism. I didn't preregister, but registered once we arrived.

We were the only DeLorean at this show. We met another owner from a city about 25 miles from me a few weeks ago at a local cruise-in at this same place, but we didn't bring our DeLorean to that event. They were unable to come to this show, but it was nice being the only DeLorean there.

I was given a spot next to all of the motorcycles at the show:
Photobucket 

Photobucket 

Photobucket 

The reactions that the car got were very positive. I didn't hear anyone say anything negative about the car. One guy commented that he was surprised that they didn't come with a V8 in them. We had about 10 people ask us about the flux capacitor or where it was. Even though we had a "do not touch" sign on the car, we discovered a few fingerprints after the show was over.

We even won an award for our first show. We got the "Sponsor Choice" award, shown here in the car:
Photobucket 

It really was a great time associating with so many people that have such a passion for their cars. I am also a fan of Corvettes, and there were two red ones there that I thought looked just fantastic. One was a 1979 and the other was a Z06 from an unknown year:
  Photobucket 

Photobucket 

Photobucket 

There were also quite a few cars that I didn't like, as well as a few that made me scratch my head, like this 60s Mustang that had been supercharged. There were three gauges that they mounted outside of the car, which I am not a fan of:
Photobucket 

I'm looking forward to participating in more shows this year. I definitely need to get the air conditioning working for the summer heat first.

Monday, March 19, 2012

30 year old DeLorean spare tire

While working on repairing the clutch hydraulics, I tested my spare tire and discovered that it would not hold air for more than a few hours, even though the tire looked like it was in perfect shape. It felt hard as a rock to the touch, which gave the impression that it had a lot of air pressure, but when tested, it would register zero.

Thanks to the vast info available online, I discovered that you can't buy a spare tire from a regular tire shop, and that the best option is to go to a junkyard and find a newer car that has the same spare tire size and to swap the newer rubber onto the DeLorean spare rim.

I also discovered that the spare tire size of T125/70 D15 is a very common spare tire size today. I went to the pick-a-part junkyard and had a bit of trouble initially finding one, but eventually found a few. I picked one that had the most recent date stamp on the tire. I paid $10 for it and headed over to Discount Tire to have them swap rims.

I was hoping that they would just do it for free since I have bought so many tires from them in the past, but they charged me another $10 in labor to switch them out. I didn't bother taking any pictures of the newish tire, but it is holding a steady pressure of 60 psi, in case I ever need it in the future. This was a very easy thing to do, but I just had to take the time to go find a tire and pay to have them switched. More time consuming than difficult.

DeLorean CV Boot replacement

While I was under the car repairing the frame rust last month, I noticed that the CV boot on the driver side was not even attached at the lip. I also discovered that the passenger side CV boot was nearly in two pieces. That's bound to happen after 30+ years.

So I ordered a CV boot kit from John Hervey at Special T Auto. It was back ordered and took a few weeks to get, but it came with everything I needed to rebuild the CV joints. This was a relatively easy job, but just messy. Luckily I have a stash of latex gloves to help keep my hands a bit cleaner, and I used plenty for this job. There is a great write up on www.dmctalk.org on how to rebuild the joint. Since mine has been trouble free and hasn't made any noise, I decided to not completely disassemble the joint itself, but to just wipe out as much of the old grease from the joint before repacking it.

Here is the drive axle with one of the joints removed:
Photobucket

It really was as easy as the write up shows. Once the drive axles were removed from the car, and I did them one at a time so I didn't mix them up, I put them in my vice for ease of working on them and went to town. I simply removed the old boot clamps that were obviously original to the DeLorean. I then disassembled the joint. The hardest part was the old snap rings. The new kit even came with replacement snap rings, which I didn't realize until I had completed the first joint. The old one works just fine, however.

Here is the half-torn CV boot from the passenger side:
Photobucket

I used dozens of paper towels wiping out the old grease before putting on the new boot. I repacked the grease on both sides and worked it in before sealing everything up. The kit came with heavy duty zip ties that allowed me to tighten them really well to ensure no leaking. Here is one of the joints all put back together:
Photobucket

Here is a completed drive axle with two new boots:
Photobucket

The hardest part of the job is taking the drive axles out of the car, and then back in. The actual job of rebuilding the joints is easy if you follow the instructions. After approximately 100 miles of driving, the boots look perfect and show no leaks anywhere.