Friday, January 21, 2022

Reinstalling DeLorean engine and transmission

 After successfully mating the engine and transmission back together after several months apart and all the other prep work had been completed (frame cleanup, new motor mounts, restored transmission mounts, etc.), the time had arrived to put them back into the car. 

The process to reinstall them was much more delicate, deliberate, and slow than taking them out of the car. It took a lot of adjusting with the load leveler to get the angles right, getting the transmission under the body of the car without having the engine hit the back of the frame.

In addition to using the engine hoist and load leveler, I also had a jack under the frame to raise and lower the car when necessary. This turned out to be very helpful to be able to adjust the height of the car in addition to height of the engine and transmission.

The last hurdle to cross is to get all of the mounts to line up correctly. I was able to get the transmission mounts close enough to be able to put the bolts through the mount holes which allowed me to then focus on getting the motor mounts to line up. It took a bit of wiggling of the motor, but eventually I was able to get it to fall into place into the mounts.


Next up will be to hook up the transmission linkages, electrical connections, fuel lines, cooling lines, and anything else required for the motor to run before firing it up again.

Tuesday, January 18, 2022

Replacing DeLorean positive battery cable and refreshing battery compartment

 After pulling out the engine and transmission to fix a broken motor mount, I discovered something very unusual with the positive battery cable. It had been wrapped in a lot of electrical tape, clearly not done at the factory.


 After unwrapping this, I was horrified that I had been driving the car like this for the last 10+ years. The wire had melted nearly in half in some point in the past. The green copper corrosion showed that it had been this way for a very long time. Unbelievable. I ordered a new cable and undertook the uncommon task of replacing that cable.

The positive cable runs from the battery compartment, over the top of the rear trailing arm, then goes between the frame and the fiberglass under body. If the cable has never been removed, it is held in place by multiple clips, which makes it very difficult to get it out. I realized that if I could barely get it out, it would be just that much harder to get a new cable in. I had the genius idea to connect a thin metal wire to one end of the cable that I was removing so that I could have a guide wire to pull the new cable through.


I found I could get more pulling leverage if I pulled it out towards the engine instead of from the battery side. I lifted up the passenger side of the under body to try and get as much room for the cable to move and I ended up breaking all of the clips that hold the cable to the frame as I pulled and tugged on the old cable. I finally got it out and you can see the metal wire I used as a fishing line below:

Getting the new cable in was just the reverse. It was much easier getting the new cable fished in than it was getting the old one out. Here is the final product with the new cable installed:

In the process of installing the new positive battery cable, I discovered that my battery compartment was in pretty sad shape, first evidenced by the crusty bracket holding the battery strap:

After taking out the battery, I found a badly worn battery pad and very corroded bolts for the rear air deflector shields that I have never had installed on my car. Those bolts were just loosely sitting there with no nuts on the outside holding them in, but were just held in by a little RTV sealant.

The bolts on the outside that held these pieces in place were not in any better shape either:


I started by removing the bracket that holds in the battery strap:

I then removed the battery pad, which had been adhered to the bottom of the battery compartment. That took a lot of scraping and Goo Gone to get it clean. I also removed the rusty bolts for the air deflector shields. I then sandblasted and painted the battery strap bracket, got stainless retaining strips for the rear deflector shields, and put in a new battery pad from DMCH:


I also replaced all of the external nuts and bolts with stainless steel, greatly improving the look and restoring the look of each of those components:

For some other cosmetic improvements, I took the original starter and painted it with black POR-15 to make it look new again:


I also restored the look of the coil suppressor and replaced all of the little nuts and bolts in that area with stainless steel:


Wednesday, January 12, 2022

Replacing DeLorean clutch and rear main seal

 Removing the transmission from the car for the first time, it made sense to replace the original clutch. After all, it's over 40 years old and chattered a bit when backing in and out of the garage. As a "while you're in there" job, this was the perfect time to address the "been leaking for way too long" rear main seal. My motor, frame, transmission, and anything close them, had a nice layer of black buildup from the years of the leaking rear main. 

Since I pulled the motor and transmission from the car together, step 1 after that was to remove the bolts holding the tranny securely to the engine. Step 2 involved cursing, wiggling, prying, and pulling until the splines on the clutch shaft finally let loose.

Here's what the old pressure plate looked like after separating the tranny from the motor. There were some pretty deep grooves in the center of the pressure plate, shown below where there's no corrosion:

Here's the flywheel in all of its heated glory:


Here's the old clutch:


Inside of the bell housing with the crusty old clutch fork, throw out bearing, and a cm thick of black goo built up on the bottom. Yummy.


Here's the buildup of sludge on the motor side. The rear main seal hasn't been doing a very good job in a long time.


I got the motor and tranny cleaned up nicely before proceeding with the replacement parts. The cleaning of parts that may never see the light of day again took way longer than I'd like to admit, but at least I know that they're going back together clean and not covered in sludge. It will hopefully make it easier to see and identify future leaks.


It was easy to clean up the bell housing on the trans... because I broke the old one trying to drill out a snapped slave cylinder bolt, covered here. The new one was already nice and shiny.


If you don't want to read that entire novel of a post, the long story short of it is that the slave cylinder is now installed with two bolts instead of just one:


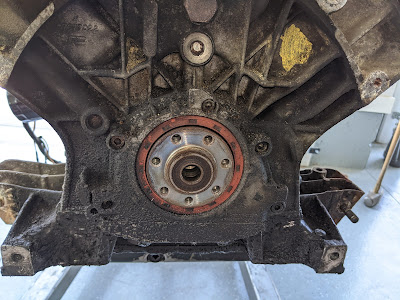
On to the rear main seal. I cleaned up the area even more. Taking it off is pretty straightforward with the bolts around the rear seal plate and two bolts on the bottom of the block.


 Here is the area with the rear seal plate removed, which holds the rear main seal in place:


As part of the clutch replacement, I replaced the pilot bearing. I'm not sure why my pilot bearing was sticking out so much. I was able to pull it out pretty easily and it did not feel smooth when I rotated in my hand. It was definitely bad and in need of replacement. The new one is butter smooth. 


Here's with the pilot bearing removed:


Pilot bearing installed:


Rear seal plate bolts cleaned up, new rear main seal installed, sealed the top portion with Right Stuff gasket maker and the bottom with the same stuff used to seal the transmission halves together, Permatex 51813 Anaerobic gasket maker.


Ready now to install the resurfaced flywheel with the proper step on the flywheel, as well as the new bolts with locktite.  


Using a clutch installation tool, here's the clutch installed the correct way, ready to have the new pressure plate installed:

Pressure plate installed, new bolts and washers installed with Loctite and torqued appropriately. I love shiny new parts!


New clutch fork and throw out bearing installed. Ready to mate the transmission back to the engine!

Since I had the engine and transmission removed from the car for all of this work, I had to come up with a good way to reattach the transmission to the engine. I decided to put the engine on wood blocks, then use the engine hoist to position the transmission into place. It ended up working well. I'm now just about ready to put them back into the car.