Tuesday, December 24, 2024

The saga of removing, restoring, and installing a DeLorean dashboard

My original DeLorean dashboard has had a large crack since before I purchased the car in 2011. The crack went from the corner of the glove box to the windshield, which was unfortunate as that was really the only major blemish. There were a handful of other minor imperfections from the last 40+ years, but I hadn't really made it a priority to fix this until I decided to dive into a big interior overhaul. Here are some photos of the original dash:


I purchased a reproduction dashboard from DMCH for $299. These dashes are an economical way to get a dash that is cosmetically better than the cracked original, but they are all plastic. I knew others that had railed against these plastic reproductions, but my understanding was that their biggest gripes came from discoloration from the plastic from over-tightening the nuts securing the dash to the underbody. What I didn't anticipate was that the screws holding on the glove box lid would also be screwing into the plastic, which doesn't have nearly the same holding strength as the metal frame on the original dash. 

I removed the dash as part of an overall larger project, which involved restoring the AC unit assembly, new A/C lines, new headliner, etc. which I have written about previously. If I were going into this only to remove the dashboard, it would still be quite a bit of work as the center console has to come out, as well as the binnacle, glove box, and knee pads. I already had all of those out to get to the A/C unit assembly, so removing the remaining nuts holding on the dash was pretty straightforward. The hardest nut to remove was in the center of the dash, the one being closer to the windshield. It's just a stretch to reach it and kind of a tight area when the A/C unit assembly is in the car. 

The other nuts are all accessible when lying on your back on the floor with the seats removed. Removing the nuts holding the speakers on can be tricky to get to as well, but it just takes a little patience and a deep socket. 

Here it is after I got the dash out:


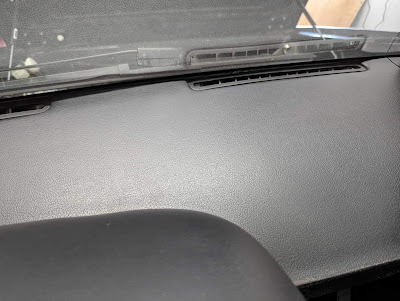
Here are some pics of what the plastic reproduction dashboard looks like:


I drilled out the pop rivets on the VIN plate on the original dash and installed the VIN plate on the new reproduction dash. Putting the dash in the car was pretty straightforward with some wiggling to get it to seat correctly. Here it is in the process of getting installed:


As soon as I installed the glove box lid, I knew that I wasn't going to be happy with the reproduction dashboard. I just couldn't get a secure enough fit with the plastic frame being all that I could screw into. This made it so that the glove box lid sat higher than before and I couldn't get the lid to consistently close seamlessly like it used to on the original dash. It's not super obvious in the photos, but this is how the glove box lid sat after I got it installed as best as I could, which I wasn't happy with.


You can also see a metal plate in front of the glove box, which is a new support bracket that I also installed to give that section some more rigidity and strength. Here's a front view of it installed:

I had another DeLorean owner that had successfully restored my rear interior quarter panel cover using a vacuum form method he has mastered. He had also used this same method to restore several original DeLorean dashboards, so I reached out to him and got my original dash packaged up and shipped to him for him to restore mine. It cost over $1500 with shipping costs, but he did an excellent job and I got it back within a few weeks. 

He was great about sending me updates and pictures along the way. Here it is during the stripping process to reveal the black foam underneath:

The original foam typically has some voids that never showed through. I was sent this photo showing one of those foam voids:

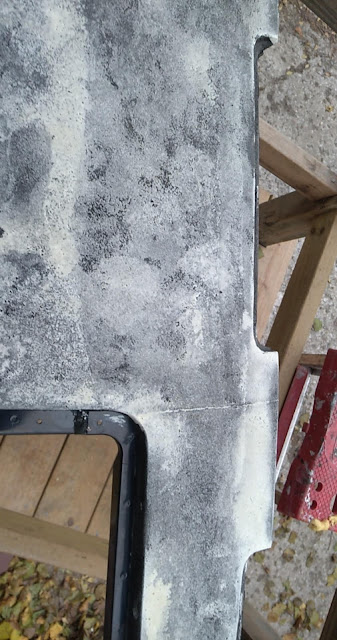
Here it is completely stripped:

A new layer of foam was then put on to build it up and have a perfect surface for the new material.
 
The dried foam was then sanded down and new speaker sections were glued into place:


The new material was then glued and trimmed out:

 
The speaker holes then had the holes punched in them:
Here are the pictures I got with it all completed:


Knowing I was going to get my perfect, original dash back, I was more than happy to undo all of the work I had just done in getting the reproduction dash in my car and happily removed it. I took off my VIN tag and put it back on the original dash. Here are some pics of my restored original dash after I got it back and during the process of securing the VIN tag:


I was very excited to get it back in the car and put it in the same day that I opened up the box. It went in extremely well, like it wanted to go back home. I'll be putting the rest of the interior together in the coming weeks, but here it is installed and ready for another 40 years:


The look and feel and the texture of the material used to recover the dash are extremely close to the original. I'm excited to get this put back together and back on the road. I'll see if anyone is interested in purchasing the reproduction dashboard, but I won't hold my breath.

Sunday, December 1, 2024

Fixed broken DeLorean seat bottom

A while back, I had to kneel on the driver's seat to access something in the car when I felt the seat "give" a little. I believe that's the moment that the rubber mat under the seat tore, which made it feel like the seat bottom didn't have much padding and made the seat quite uncomfortable. Here's what that looks like:

I attempted a repair myself by finding some nylon material at JOANN Crafts, and put that in place to better support my backside. So I took out the broken rubber material:


The material needed to be strong enough to support my body weight, but hopefully also have a little give to it like the original rubber. The material I found was the kind of webbed material that you might find on patio furniture, which meant that it would be durable and strong, but it had zero give. This was the final result:

It was better than the broken rubber mat, but it just didn't feel as good as before. I ran it this way for a couple of years, but when I underwent an overhaul of the car's interior, I thought I'd attempt a better repair by having a local upholstery shop see what they could do.

They were unable to find a similar material to the rubber that was original, so we settled for another material that seemed to have a little bit of give to it. I haven't gotten the interior back together to see how it feels, but I'm hopeful that it will be a better solution to my temporary fix. It sure looks a lot prettier, even though I'm the only person that will ever see this side of the seat:

Time will tell how much I like this fix.

Replaced original DeLorean A/C system and radiator

My DeLorean's A/C hasn't worked since I bought it. All of the original R12 had leaked out by the time I came to own it in 2011. A couple of years after I bought it, I flushed out the original system w/ mineral spirits and converted the fittings over to R134a. I had working A/C for a very short driving season that year before all of the refrigerant leaked out. I added some leak dye on the next refrigerant fill up, but even then, I couldn't ever find the source of the leak. I also suspected a problem with the original compressor at the time and replaced it with a new unit.

I concluded that the original A/C hoses were likely allowing the refrigerant to seep out, or I had a potential problem with the evaporator in the A/C housing. I knew that at some point, I would need to overhaul my entire system if I wanted reliable A/C. 

Earlier this year, I dove into a project on the interior of my DeLorean that involved removing much of the interior, including the dashboard, and I thought that if I was going into it this deeply, now would be the best time to remove the A/C unit housing and include that as part of the interior overhaul. While doing that, I should replace the A/C lines with a modern replacement, the cooling fans, the evaporator, condenser, and everything else on the system, minus the new A/C compressor. 

My engine cooling system was in great shape with the exception of the radiator of unknown age. I had replaced all of the cooling hoses and pipes a few years ago, including a new water pump, and the radiator was the only unsure thing remaining. I didn't know if it was the original radiator or if it had been replaced by a previous owner at some point. I decided that I didn't want to dive into the front end again like this for a radiator replacement, so I thought it best to replace it as well.

I already wrote extensively about the A/C unit housing restoration, which you can find here. The rest of the A/C overhaul was pretty straightforward. The condenser came out with the radiator. Here are some photos of that during the process:


The hose connections on the condenser came off much easier when it was lowered and more accessible with a large wrench. There was quite a bit of nasty brown fluid that came out of the hoses and the condenser once I had them disconnected.

While I was in there, I chose to replace my original cooling fans with modern replacements. Might as well, right? A little before and after action:

These fans mounted right into the original mounting holes on the fan shroud, which in turn mounted right up to the new radiator. 

Getting the accumlator/dryer out was definitely the hardest part of the whole job. As anyone that has looked at the A/C dryer, there is little room to work. I couldn't get the connection loose coming from the evaporator to the dryer and didn't want to hack up the fiberglass underbody in order to create more space, so I whipped out the Sawzall and cut off the connection on the dryer in order to free it up. Even with the dryer out of the way, that connection took a lot of force to finally come free.

I then moved to the A/C lines and chose to route the new lines the same way the original lines were ran. I cut off the hoses near the compressor, taped the end of the old line to the new line, then fished the old lines out while the new lines but pulled into place. 

The new lines were from DeLorean Industries and don't come with any connections pre-installed, which makes it easier to fish the new lines in between the underbody and frame. The kit uses a clamping system that I had to watch a video on YouTube in order to figure out, but seems really solid. I really like how the hoses are longer than needed and you trim them down to length, which provides extra flexibility for any changes in the routing. 

I routed the line near the steering shaft further up to avoid any rubbing as the steering shaft rotates around. This route seemed like the best option to avoid future problems:

The only issue I encountered with all of the new parts was with the new condenser. One of the four nuts on the mounting bolts was stripped and wouldn't come off so I could connect it to the radiator. I contacted the vendor (DMCH) and they promptly sent me a new mount at no charge, which fixed the issue after I swapped the parts.

Winter is setting in now, so I won't have a chance to charge the all-new A/C system until next year. I'm sure there's a fitting or connection somewhere that I'll need to snug down, but everything is back together. I did get the car running so I could burp the new radiator and all of that is also back together and working great so far. The new fans also came on when the car got up to temp. They sound surprisingly quiet compared to the original fans. I also made sure that they were wired up correctly to pull air instead of pushing air back towards the radiator, which other owners have mistakenly done before. All checked out there and I fully expect to have many uneventful heating and cooling years ahead with this huge and pricey overhaul. 

Speaking of price, here's a rough rundown of what some of the key items cost in 2024:

  • Radiator: $300
  • Cooling fans: $200
  • Condenser: $200
  • Evaporator: $220
  • Heater core: $190
  • A/C hose kit: $670