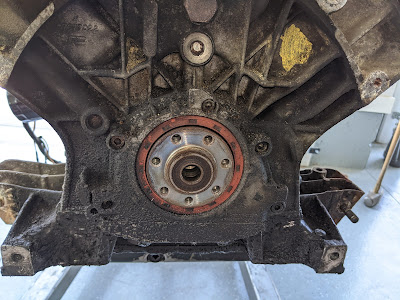
Removing the transmission from the car for the first time, it made sense to replace the original clutch. After all, it's over 40 years old and chattered a bit when backing in and out of the garage. As a "while you're in there" job, this was the perfect time to address the "been leaking for way too long" rear main seal. My motor, frame, transmission, and anything close them, had a nice layer of black buildup from the years of the leaking rear main.
Since I pulled the motor and transmission from the car together, step 1 after that was to remove the bolts holding the tranny securely to the engine. Step 2 involved cursing, wiggling, prying, and pulling until the splines on the clutch shaft finally let loose.
Here's what the old pressure plate looked like after separating the tranny from the motor. There were some pretty deep grooves in the center of the pressure plate, shown below where there's no corrosion:
Here's the flywheel in all of its heated glory:
Here's the old clutch:
Inside of the bell housing with the crusty old clutch fork, throw out bearing, and a cm thick of black goo built up on the bottom. Yummy.
Here's the buildup of sludge on the motor side. The rear main seal hasn't been doing a very good job in a long time.
I got the motor and tranny cleaned up nicely before proceeding with the replacement parts. The cleaning of parts that may never see the light of day again took way longer than I'd like to admit, but at least I know that they're going back together clean and not covered in sludge. It will hopefully make it easier to see and identify future leaks.
It was easy to clean up the bell housing on the trans... because I broke the old one trying to drill out a snapped slave cylinder bolt, covered here. The new one was already nice and shiny.
If you don't want to read that entire novel of a post, the long story short of it is that the slave cylinder is now installed with two bolts instead of just one:
On to the rear main seal. I cleaned up the area even more. Taking it off is pretty straightforward with the bolts around the rear seal plate and two bolts on the bottom of the block.
Here is the area with the rear seal plate removed, which holds the rear main seal in place:
As part of the clutch replacement, I replaced the pilot bearing. I'm not sure why my pilot bearing was sticking out so much. I was able to pull it out pretty easily and it did not feel smooth when I rotated in my hand. It was definitely bad and in need of replacement. The new one is butter smooth.
Here's with the pilot bearing removed:
Pilot bearing installed:
Rear seal plate bolts cleaned up, new rear main seal installed, sealed the top portion with Right Stuff gasket maker and the bottom with the same stuff used to seal the transmission halves together, Permatex 51813 Anaerobic gasket maker.
Ready now to install the resurfaced flywheel with the proper step on the flywheel, as well as the new bolts with locktite.
Using a clutch installation tool, here's the clutch installed the correct way, ready to have the new pressure plate installed:
Pressure plate installed, new bolts and washers installed with Loctite and torqued appropriately. I love shiny new parts!
New clutch fork and throw out bearing installed. Ready to mate the transmission back to the engine!
Since I had the engine and transmission removed from the car for all of this work, I had to come up with a good way to reattach the transmission to the engine. I decided to put the engine on wood blocks, then use the engine hoist to position the transmission into place. It ended up working well. I'm now just about ready to put them back into the car.


No comments:
Post a Comment