In my attempt at making the car better by replacing the rotten motor mounts, I snapped one of the bolts holding the passenger side mount to the frame, leading me down the path of pulling the motor to be able to fix it. First, I didn't have an engine hoist, load leveler, or engine stand, but found a local guy selling all three, plus a second engine stand, all for a decent price. I snagged them up and felt ready to dive in on the DeLorean.
I found an extremely useful and well-written guide to help walk me through the process so that I didn't miss any crucial steps and would highly recommend checking out this walkthrough if you find yourself going down this rabbit hole like me.
First, I wanted to do whatever I could to ensure that I wouldn't get stuck or flustered when it came time to reassemble pretty much any part, so I did my best to document the placement and routing of just about everything I could think of, including vacuum hoses, electrical connections, fuel lines, etc.
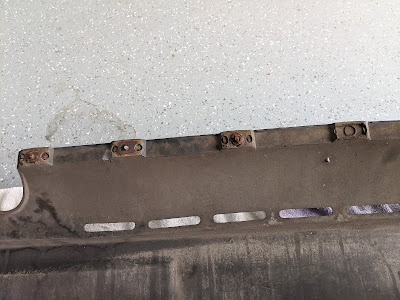
I started by removing the rear fascia, followed by the rear closing panel. I knew that most of the lower studs on the rear fascia that connect to the rear fascia lower support bracket were going to snap off as I had already broken one off years earlier when I thought I would attempt to replace the original support bracket. The rest of the rear fascia came off without much incident.
Here's the crusty lower support bracket for which I have had a replacement from the previous owner for over 10 years and never bothered dealing with it. I expected the rear impact absorber to look worse than it did, but it will still need to be refurbished as the original protective coating is cracking and flaking off.
The rear closing plate had a lot bolts, cables, and wires that needed to be taken off or disconnected before I was able to take it off. One surprise to me was that two bolts on the driver side were holding in the antenna bracket in the rear pontoon, so the antenna is now sitting loosely in the pontoon when I had it aligned and working perfectly to come out of the hole in the rear quarter panel.
You also have to disconnect the engine cover release cable, the rear side market lights, all included in the guide I referenced earlier. I took a few photos along the way to make sure I remembered how it all looked and went together. I also did the unusual (for me) step of putting nuts and bolts in baggies with labels on where they went so that I didn't end up with just a mess of nuts and bolts with no idea where they went. I HIGHLY recommend doing something like that.
Here's my grouping of ground wires that come together on the rear driver side.
The motor already appeared to be much more accessible once the rear closing plate came off.
As I went along, I also started a list of replacement parts that I knew I would want to order. Many of those parts would be replacing nuts and bolts with their stainless steel variety. Others would be to repair broken or worn out parts, such as the studs on the bottom of the rear fascia. Here's what the snapped off bolts looked like:
Here's the crusty lower support bracket after being removed from the car.
Better view of the stock muffler with the lower support bracket out of the way:
Strangely, I found some parts were just simply missing, even though I wasn't going to be touching some of those parts, such as this body mount bolt in the rear passenger area. I later ended up finding a completely rusted body mount bolt sitting in the rear passenger pontoon, but no captive nut. It was beyond usable, however.
Pictures of miscellaneous ground wires for future reference:
I found it cool to see the original tape still in place on these brackets. Taking off the tape was oddly satisfying:
I then removed the lower engine cover and the rear louvre. I did this all by myself, but it's a bit hard because of how awkward it is to loosen the bolts while trying to support the louvre at the same time. I imagine I'll need another set of hands to put them back on.
I was pleasantly surprised at how well the muffler came out of the car. I was afraid it was going to fight me, but the connections all came loose without issue and I was able to work it off of the car without much incident.
I was caught off guard when I took the muffler off that many small chunks fell out of the muffler's inlet side. Wrench is for size reference:
I figured it was from the catalytic converter, which it was. I was already toying with the idea of an aftermarket exhaust anyway, but I previously had zero signs or indications that there was a problem with the cat.
More to come...


No comments:
Post a Comment