Monday, December 24, 2012

Rusty DeLorean headlight buckets

While getting the DeLorean ready to work on the lower ball joints, I noticed some rust on the headlight buckets and screws. I decided to remove one of the passenger side headlights to get a better look as to what is going on there. After I took out the headlight, this is what I found:

Photobucket 

The rust is just surface rust, so it can be cleaned up very easily. As I began trying to clean up this headlight bucket with a wire wheel, I decided that I might try using POR15 instead of just a rustoleum spray paint. I want the restoration to last for the life of the car, and sometimes rustoleum doesn't last. In order to get the other lights out easily, I may end up removing the front fascia. I haven't decided the best way to make these look nice again, but I'm in no hurry as it is now winter and I don't plan on driving the DeLorean until the salt is off the roads. 

Bad DeLorean Lower Ball Joint

I went to go have an alignment done this past weekend and the shop discovered that the lower ball joint on the driver side is shot. I found this odd since the previous owner had replaced these just a few thousand miles ago. I discovered that the batch of lower ball joints that the previous owner had installed were faulty and a poor design. This caused many to fail prematurely, as noted by many owners on the DeLorean forum at www.dmctalk.org.

In order to never have another lower ball joint failure, I purchased upgraded ones from the DMCUK club for $130 for the pair. I might as well replace both of them now. Below is a video that I took that shows how much play the ball joint has and why it needs to be replaced:

While looking through the list of past repairs on my DeLorean, I also discovered that the previous owner had replaced the original lower control arms with aluminum ones, which is great because I will not have worry about them rusting out like so many that I have seen.

Below is a picture of the front driver side suspension that I will be disassembling to replace the ball joint:

Photobucket 

Since it's Christmas time and I just barely ordered the parts, the DeLorean may be out of commission for a while until the parts arrive. All I can do for now is wait. I'll post an update once I have these installed.

Replacement DeLorean Brake Master Cylinder

One of the first repairs that I did on the DeLorean after I first bought it was replacing the brake master cylinder. When I bought the DeLorean, I knew that it was in need of replacement. I had to pump the brake pedal to build up enough pressure to stop. This job was very straightforward and I didn't take any pictures. I just had to have something to catch the brake fluid that came out when I removed the two brake lines from the master cylinder. I then unbolted the master cylinder from the power/servo unit.

I then removed the original fluid reservoir and cleaned it out with brake cleaner before installing it on the new master cylinder. I then bench bled the new master cylinder before installing it into the car. I then hooked up the brake lines into the new master cylinder before bleeding the brakes at all four wheels. I prefer to bleed the brakes with someone else helping me by pushing on the brake pedal.

The brakes immediately felt better after going out for a test drive. Here is a picture from underneath the car of the new brake master cylinder:

Photobucket

Tuesday, October 9, 2012

DeLorean Cold Start Issue

Here in the Rockies, it can get pretty cold. Last fall and winter, when I would go to start the DeLorean when the engine and temperature were cold, it would just crank and crank. If I cranked it a few times, then left it alone for about 5 to 10 minutes, it would usually start up after trying again.

Dave at DMCMW thought that the problem was the TTS (thermo time switch), which basically tells the fuel system to deliver more fuel upon starting when the engine is cold. Well last winter came and went and I almost forgot about the cold start issue because it doesn't occur unless it is below about 50 degrees F.

It was cold here a couple of weeks ago and the car started showing symptoms of the cold start issue again. It just so happened that I was in Houston for business again and decided to use this as an excuse to stop by and pick up the part. I snapped a couple of photos outside the building again:

Photobucket

Photobucket 

It was nice to save a few bucks on shipping for such a small part.

The old switch came out quite easily, but what I didn't know what that coolant was going to start gushing out of the hole where the switch goes. I had to quickly get the new one threaded in to minimize the mess in my garage. Here's the old switch that I took out:
 Photobucket 

Here's the new switch installed correctly:
  Photobucket 
I did the install on a very cold morning and did not attempt to start the car until I completed the install. When I went to start it cold, it fired up with no problems on the very first try. Problem solved!

Tuesday, July 24, 2012

DeLorean Luggage Net Repair

I always liked the stock look of the luggage net behind the seats in the DeLorean pictures I have seen online. The net in my DeLorean was removed before I bought it, but I found it in a box of parts. I discovered that the bungee cord around the net was fraying terribly in multiple places which not only made it a terrible eye sore, but it didn't function very well either.

New old stock (NOS) net assemblies are for sale at DMC Houston, but I didn't really feel that these were worth nearly $50 for a new one. I went to local fabric stores and Home Depot, but none of them sold the bungee cord by the foot. I discovered an online company that does sell them by the foot at this website. I decided to go with the black 3/16" cord. I removed the old bungee cord from the net and it measured at about 7.5 feet. I decided to get 8 feet of new bungee cord to be safe and I would trim down any extra length.

It arrived a week later and I set the two cords side by side and cut the new cord to the exact length of the original. Here is a picture of the old, frayed cord laying next to the new bungee cord:

Photobucket

I then weaved the new cord into the net and hooked the two ends together using the supplied clamps.
Below is the image of the two connected ends:

Photobucket 

As you can see, the original net was still in great condition, but it had an awful smell, like it had spent time in a house of a smoker. It was a really strong smell too and I didn't want to reinstall it into the DeLorean without getting rid of the smell first. Before I installed the new bungee cord, I first washed it by hand, and the brown soapy water that came off that net was very gross. I then sprayed it on two separate occasions with Febreeze to eliminate the odor. I then rinsed it thoroughly and dried it in a clothes dryer. It still has a very faint smell to it, but it is extremely better than it was when I found it.

Here is the net all put back together and almost ready for assembly. The original net has some black thread that attaches the net to the bungee cord in four places so that the net is always in the same relative place on the bungee cord. Be sure to replicate those attachment points using the black string of your choice, or else the net will not look right when reinstalled in the DeLorean.

The one thing I didn't realize was that the new cord has much less elasticity than the original bungee cord. The old one was made up of many thin, gray elastic strands, but the new one appears to just be one solid, white strand of an elastic material. This means that it is much harder to stretch the new material to fit correctly on the hooks on the back shelf. If I were to do this again, I wouldn't have trimmed any length off of the 8 foot bungee cord, and I recommend getting a bit more than that. I did make it work, but the cord is definitely tight.

I hope that it will loosen up over time, but I am leaving it in place for a very long time to allow it to stretch. Here is the old net with a new bungee cord installed in my car for the first time since I have owned it:
Photobucket

DeLorean Instrument Cluster Status Updates

After I replaced the trip reset shaft, replaced the burned out battery light with a new #161 incandescent bulb, and replaced all other instrument cluster lights with the appropriate LEDs, I reinstalled the binnacle in the car. I was pleased to see that the car charged correctly right on start up because of the new battery light, but I noticed a couple of side effects from some of the LEDs.

First, the door ajar light would still dimly glow for a long time after the doors were shut. After posting about this problem on the DMC forum, I discovered that the original lamp delay relay found here doesn't play well with LEDs. This relay is supposed to slowly dime the interior courtesy lights once the doors are shut. The solution was to remove the relay from the fuse compartment and the door ajar light now functions perfectly again.

Dealing with this issue has brought to my attention the fact that my interior courtesy lights do not function as they should, nor have they ever functioned properly since I've owned the DeLorean. They come on when I switch them to "always on," but never come on in any other setting when the doors are opened like they are supposed to. This is not a huge deal right now, but I will try and get them functioning correctly some time in the future.

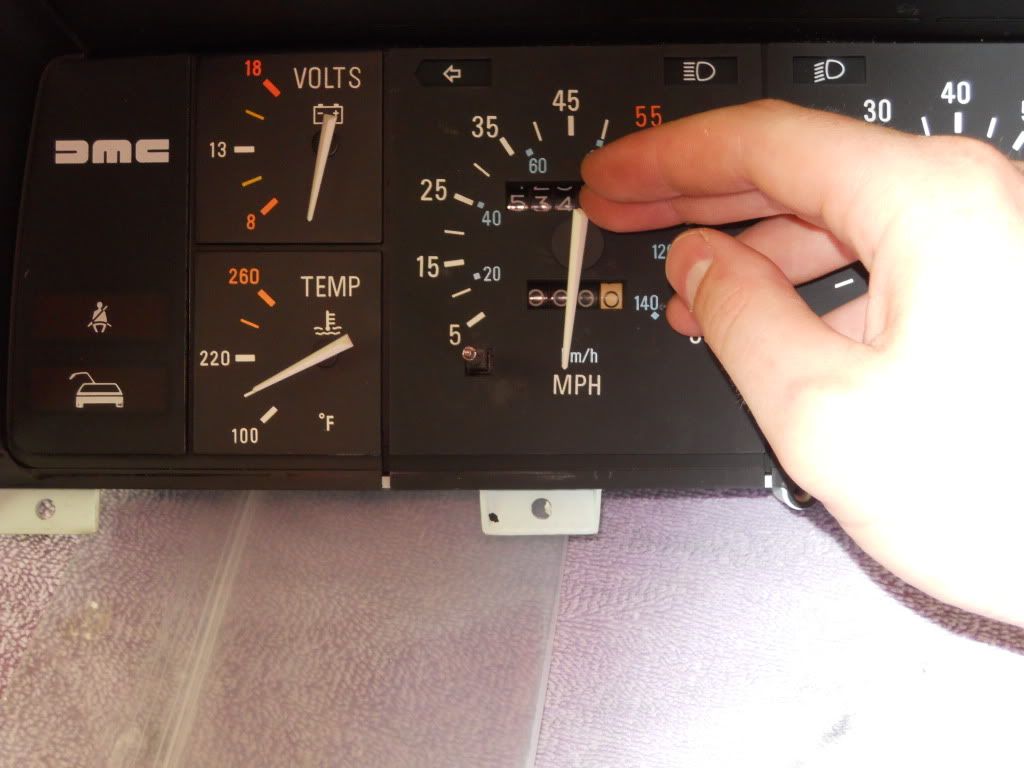
I went for a test drive after reinstalling the binnacle and I felt like the speedometer wasn't showing that I was going the right speed. It felt like it was saying I was going a lot slower than what it felt like. To test this, I used my Garmin GPS and went for a drive. Before I took the binnacle apart the first time, the speedometer was always very close to what speed the Garmin said I was going, but on this trip, I discovered that my hunch was correct and that the speedometer was showing I was going about 3 to 5 miles an hour slower than I actually was traveling.

I must not have put the needle on the speedometer in the exact position it was in before I took it apart. I removed the binnacle and put the needle to where it should have been. A test drive showed that the speedometer is now much closer, especially at speeds under 55, and then only off by 1 mile and hour at higher speeds. That is an acceptable variation for me. Here's a picture I snapped while I was working on adjusting the speedometer needle:

Photobucket 

One other issue I discovered while converting the instrument cluster lights over to LEDs was that the parking brake light started acting strangely. The light worked correctly if the car was running or if the key was set to the "On" position, but once the key was set to the "Off" position, the parking brake light would stay dimly lit if the handbrake was not engaged. It would go off immediately if I pulled up on the handbrake, but it would come back on very dimly if the brake was not engaged.

I noticed that the previous owner had some wires coming off of the handbrake that were somehow tied into the car's alarm system. It was likely causing a small draw on that circuit, causing the LED to light up. The incandescent light must not have received enough juice to cause it to light up at all, but since the LED requires less juice to light up, it brought this issue to light.

Since I didn't feel like diving any more into the car's electronics, I simply replaced the brake light LED with the working incandescent bulb that was in there previously. Putting it all back together revealed that the light worked properly again with no glowing when the car was off. Maybe I'll dig into this in the future, but I'm not going to worry about this for now, especially since the car's battery disconnect switch is engaged whenever I'm not driving the car regularly. 

Friday, July 13, 2012

DeLorean Trip Odometer Repair and LED Dashboard Lights

It's always a good feeling to come home and see a parts package for the DeLorean waiting for me. Ever since I have owned my DeLorean, the trip odometer reset shaft has been sheered off right behind the plastic as seen here in a "before" photo:

Photobucket 

Well I decided to finally fix this once I discovered that the battery light in the dash was also burned out. In my DeLorean, the alternator wouldn't charge the car until it got up to about 2500 RPMs after it was started because that light was burned out. It is an integral part of the charging system in these cars. I also had ordered some LEDs for the dashboard lights that I had yet to install and this was a great opportunity to do that too.

In order to remove the binnacle, you have to lay on your back so your head is by the gas pedal so you can remove all of the nuts holding the binnacle to the dashboard. Since I am 6 1/2 feet tall, I decided to remove the driver's seat completely to give me room to work and lay down:

Photobucket 

I won't give detailed instructions on the removal process since there are plenty of write-ups on that elsewhere on the web. I will say that it's much easier to remove all the connections on the back (speedo cable, electric connections) than it is to put them back together. This is what it looks like after the binnacle has been removed:

Photobucket

To work on the binnacle, I laid a towel on a table and went to work. This is what the back of the binnacle looks like:

Photobucket 

To replace the trip reset shaft, I just followed the provided instructions and completed the job without any problems. I also replaced the battery light with a #161 incandescent bulb from Autozone and replaced the other lights with LEDs from Super Bright LEDS. I decided to use WLED-WH5 "warm white" lights for the backlight of the instrument cluster because I didn't want the blue hue that the other color appeared to have. For a complete list of lights that I used, you can visit this blog for a comprehensive list with before and after pictures as well.

In the middle of the job of replacing the trip reset shaft, things looked a little hairy:

Photobucket 

Everything went back together fine and the initial test found that everything works and looks great. I still haven't bolted everything back down in the car, but I'll take care of that this weekend. This is what the final product looks like with the new trip reset shaft:

Photobucket